Fork me on GitHub
drqblog


  • 首页

  • 关于

  • 标签

  • 分类

  • 归档

  • 日程表

  • 站点地图

  • 公益404

  • 有料

JAVA中的服务器优化

发表于 2018-12-16 | 分类于 JAVA
字数统计: 667 | 阅读时长 ≈ 2

Tomcat服务器

就Tomcat服务器优化问题而言,首先Tomcat服务器是一个轻量级的web服务器,Tomcat和微软的IIS服务器一样,具有处理HTML页面的功能,但是Tomcat还是JSP和Servlet的容器。

首先Tomcat服务器优化性能问题可以改善以下内容:

  1、增加JVM堆内存的大小

  2.解决内存泄漏问题

  3、线程池的设置

  4、压缩

  5、调节数据库的性能

  6、Tomcat原生库的使用

1、先来说说增加JVM内存的问题,当内存溢出的时候,原因是Tomcat使用比较少的内存分配了给了进程,可以通过配置Tomcat文件下的catalina.bat文件,增加JVM内存实现。

1
2
#-Xms:指定的初始化的栈内存 -Xmx:指定最大栈内存
-server -Xms1024m -Xmx1024m

进行重启服务器后,更改。

2、JRE内存泄漏

首先Tomcat的最新版本具有较好性能和可扩展性。可以解决这类错误。通常server.xml配置文件中

有配置一个监听器来处理JRE内存泄漏

1
<Listener className="org.apache.catalina.core.JreMemoryLeakPreventionListener"/>

3、设置线程池

线程池是用来制定web请求的数量。为了获得更好的服务性能,可以通过调整配置文件里的maxThreads属性来设置。设置的数值大小应该根据请求数据的流量大小,设置的数值过于小,没有足够的线程处理请求,请求处于等待状态,只能等处理线程的释放了一个连接才处理。但是如果设置的数值太大,Tomcat启动又要消耗更多时间。

1
2
3
4
5
<Connector port="8080" address="localhost" maxThreads="200"
maxHttpHeaderSize="8192" emptySessionPath="true" protocol="HTTP/1.1"
emptyLookups="false" redirectPort="8181" acceptCount="100"
connectionTimeout="20000" disableUploadTimeout="true"
/>

4、压缩设置

在server.xml配置文件中设置压缩选项。

1
2
3
4
5
<Connector port="8080" protocol="HTTP/1.1"
connectionTimeout="20000"
redirectPort="8181" compression="500"
compressableMimeType="text/html,text/xml,text/plain/application/octest-stream"/>
<!--文件大小大于等于500byte才会被压缩。-Tomcat的默认设置compression是关闭的。->

5、数据库性能的调节

由于要等待数据库执行查询的时候相应,设置数据库连接池的最大空闲数,最大连接数,最大连接等待时间。

6、使用Tomcat原生库

使用Tomcat的原生库的(Apache Portable Runtime,APR)

7、设置浏览器缓存

设置浏览器缓存,可以使得webapps文件夹里的静态内容比如图片,pdf等内容,读取存取速度更快,提高了整体性能。而且HTTPS请求会比HTTP请求慢,如果为了安全性,还是要选择HTTPS

JAVA中的堆与栈

发表于 2018-12-16 | 分类于 JAVA
字数统计: 1k | 阅读时长 ≈ 3

堆和栈(Heap & Stack)

堆和栈都是JAVA中的存储结构,也就是说,都是内存中存放数据的地方。

1、堆Heap:(存放由new创建的对象和数组)

引用类型的变量,内存分配一般在堆上或者常量池(字符串常量,基本数据类型常量),需要通过new等方式来创建。

首先堆内存主要作用是存放运行时new的对象和数组,存取速度慢,可以运行时动态分配内存。

2、栈Stack:(基本数据类型变量,对象的引用变量)

基本数据类型变量(int,short,long,byte,float,double,boolean,char)以及对象的引用变量,内存分配在栈上。变量出了作用域就会自动释放。

由于栈是后进先出模式的。主要用于执行程序,存取速度快,大小生存期必须确定,也就是有作用域,缺乏灵活性。

1
2
3
4
5
6
7
8
9
10
11
12
13
14
15
16
public class Apple{
private int id;
private float price;
private String name;
public Apple(int id,float price,String name){
this.id=id;
this.price=price;
this.name=name;
}

public static void main(String[] args){
int a=0;//i基本数据类型变量,在栈里面存放
Apple app=new Apple(1,10,"红富士")//app是对象的引用变量,存放在栈里面,
//Apple(1,10,"红富士")是实际的对象,存放在堆里面
}
}

3、JVM

JVM是基于堆栈的虚拟机,每个JAVA程序在一个独立的JVM实例上运行,每个JVM实例对应一个堆,同一个JAVA程序内的多线程运行在同个JVM实例上,多个线程之间通过共享堆内存来实现同步。

4、堆内存和栈内存的区别

  当一个方法执行的时候,每个方法都会建立自己的栈内存,在这个方法中定义的变量将会放到这个栈内存中,随着方法的结束,这个方法的栈内存也会被自动销毁,不需要进行GC(垃圾)回收。总而言之就是,所有在方法中定义的局部变量存放在栈内存中。

  当为程序创建一个对象的时候,这个对象会被保存到运行时候的数据区中,方便反复利用(因为创建对象的成本比较大),这个运行时候的数据区就是堆内存中。堆内存中的对象不会随着方法的结束而自动销毁,有可能方法结束后,这个对象还可能被另外一个引用变量所引用。只有当一个对象没有任何引用变量去引用它的时候,系统的垃圾回收GC才会启动进行销毁。

5、创建对象的开销成本比较大

  因为创建对象的根本路径就是构造方法,通过new关键字来调用一个类中的构造方法才能创建这个类的实例。但是对象并不是完全由构造方法来创建的,当程序调用构造方法的时候,系统会给这个对象分配内存空间,然后进行对象初始化。也就是说,系统创建对象是在构造方法执行之前就完成的,只是此时这个对象还不能被外部程序访问,只能在构造方法中通过this来引用。当构造方法执行结束后,这个对象作为构造方法的返回值被返回,然后把它赋给一个引用类型的变量,让外部程序可以访问。

6、JAVA比较占内存的原因

数组和对象在没有引用变量指向的时候,才变成垃圾,不能被使用,但是它依然占着内存,随后在一个不确定的时候才会被垃圾回收GC器给释放掉。

也可以这么理解,实际上存放在栈内存里面的引用变量,指向堆内存中的对象,这就是JAVA的指针。

SpringBoot入门

发表于 2018-12-16 | 分类于 JAVA
字数统计: 1.4k | 阅读时长 ≈ 5

一、Spring Boot入门

Spring Boot来简化Spring应用开发,约定大于配置,去繁从简,just run就能创建一个独立的,产品级别的应用

背景:

J2EE笨重的开发,繁多的配置,低下的开发效率,复杂的部署流程,第三方技术集成难度大

解决:

“Spring全家桶”时代

Spring Boot–>J2EE一站式解决方案

Spring Cloud–>分布式整体解决方案

优点:

  • 快速创建独立运行的Spring项目以及主流框架集成
  • 使用嵌入式的Servlet容器,应用无需打成WAR包
  • starters(启动器)自动依赖与版本控制,想用web功能就导入web功能的启动器starters,想用redis就导入redis的starters,所有的企业级开发场景都有相应的starters启动器,导入就可自动依赖。
  • 大量的自动的配置,简化开发,也可修改默认值(通过spring boot的配置文件)
  • 无需配置XML,无代码生成,开箱即用(都是用一些写好的API,自动配置好XML,SpringBoot应用创建出来就能用,并不是说有一些自动生成的XML工具)
  • 准生产环境的运行时应用监控
  • 与云计算的天然集成
  • ps(shift+tab退出无序列表)

缺点:易学难精

1、Spring Boot简介

简化Spring应用开发的一个框架

整个Spring技术栈的一个大集合

J2EE开发的一站式解决方案

2、微服务

微服务文档

Microservices:a definition of this new architectural term

微服务:架构风格

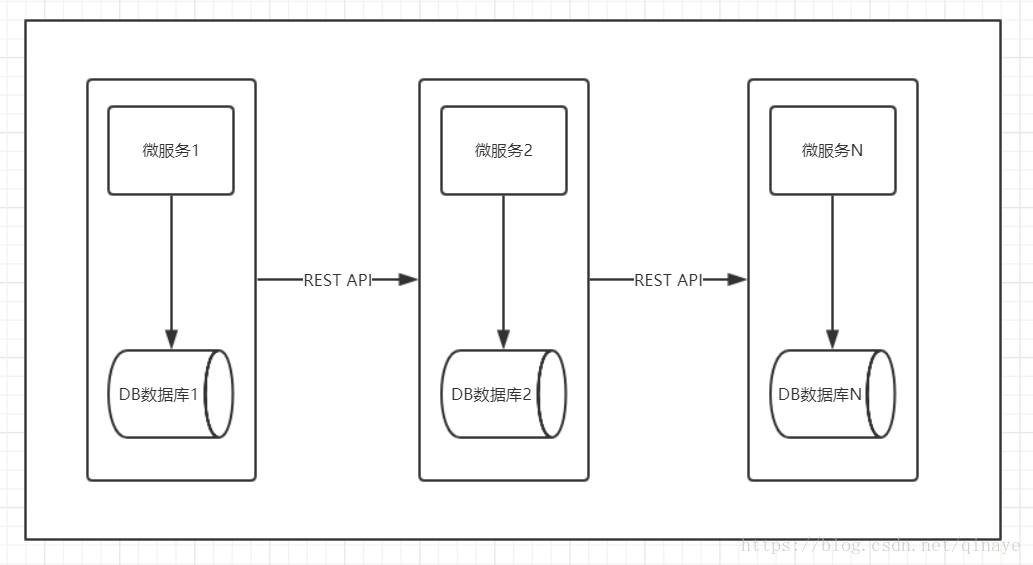
the microservice architectural style is an approach to developing a single application as a suite of small services, each running in its own process and communicating with lightweight mechanisms, often an HTTP resource API.

一个应用应该是一组小型服务:可以通过HTTP的方式进行互通

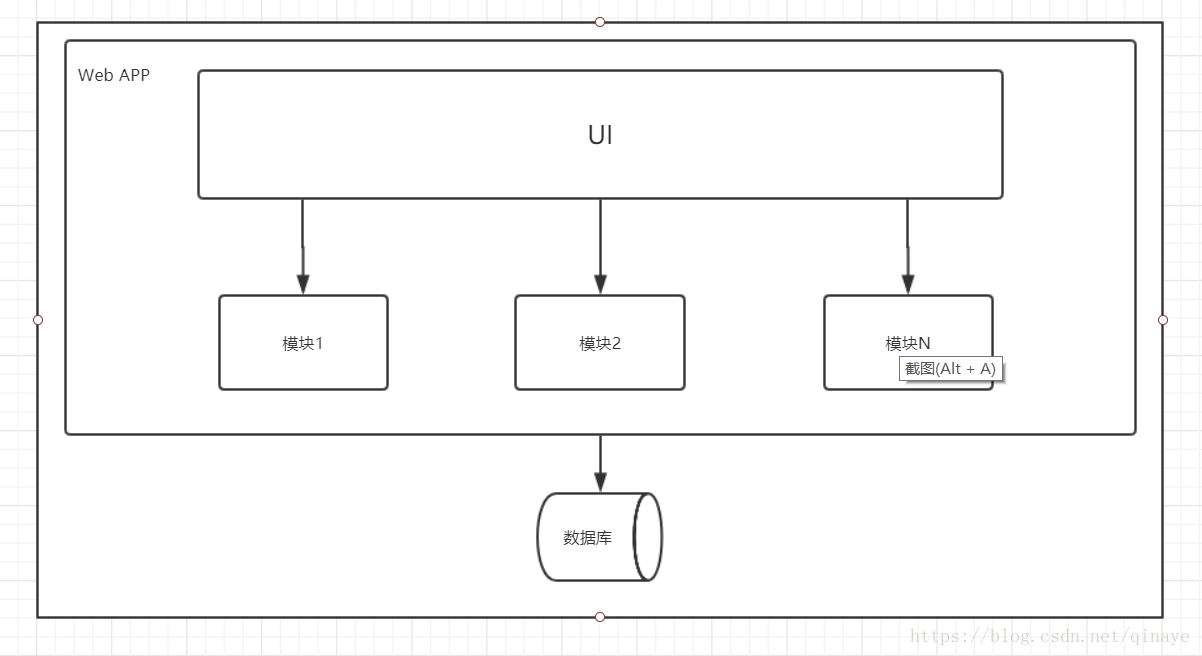
单体应用:ALL IN ONE所有的东西都写在一个里面

Traditional web application architecture

单体

OA,CRM,ERP系统,以前都是创建一个应用然后将所有的页面,代码都放在这个应用里,然后把整个应用打包打成WAR包,然后部署到Tomcat上,应用访问数据库,提供前端访问的页面,这个应用就跑起来了,这是传统的WEB应用架构模式,传统的优点:比如开发测试简单,develop test deploy scale,开发,测试,部署,扩展也都简单。

水平扩展也简单,当我们应用负载能力不行的时候,我们把相同的应用复制上十几份,放在十几个服务器里,十几个服务器都来跑我们这些应用程序,我们通过负载均衡机制,就可以来提高我们的并发能力。

单体应用的问题:

这是一个牵一发而动全身的问题,有可能因为我们一个小小的修改,导致我们整个应用重新打包部署运行。

更大的挑战是我们日益增长的软件需求,现在可能随便一个应用都有可能成为一个大的需求,大应用不可能全部ALL IN ONE写在一个里面,然后应用到底有多大,该如何维护,该如何分工合作,这是一个问题。

微服务

微服务

单体应用:

就是打破以前的传统方式,以前是将所有的功能单元放在一个应用里面。然后把整个应用部署到服务器上,如果服务器负载能力不行,把同一份应用水平复制,然后扩展到其他服务器。

微服务:

一个微服务架构把每个功能元素放进一个独立的服务中,把每个功能元素独立出来,通过功能元素的动态组合,比如A服务器需要某个功能元素多,就多放一点,B服务器需要某个功能元素少,就少放一点

并且通过跨服务器分发这些服务进行扩展,某些功能只在需要时才复制。也就是功能元素级别的复制,并不是整个应用的复制。1、节省了调用资源,把服务微化起来2、每一个服务都应该是一个可替换的,可独立升级的软件单元

区别

每一个功能元素最终都是可独立替换,可独立升级的软件单元

SOA架构和微服务架构区别:

  • SOA(Service Oriented Architecture):面向服务的架构,一种设计方法,其中包含多个服务,服务之间通过相互依赖最终提供一系列的功能,一个服务通常以独立的形式存在于操作系统进程中,各个服务之间通过网络调用。

  • 微服务架构:其实和SOA架构类似,微服务是在SOA上做的升华,微服务架构强调的一个重点是“业务需要彻底的组件化和服务化”,原有的但各业务系统会拆分成多个可以独立开发,设计,运行的小应用

    这些小应用之间通过服务完成交互和集成

主要区别:

功能 SOA 微服务
组件大小 大块业务逻辑 单独任务或小块业务逻辑
耦合 通常松耦合 总是松耦合
公司架构 任何类型 小型,专注于功能交叉团队
管理 着重中央管理 着重分散管理
目标 确保应用能够交互操作 执行新功能,快速拓展开发团队

掌握内容:

  • Spring框架
  • 熟练使用Maven进行项目构建和依赖管理
  • 熟练使用Eclipse、IDEA

环境约束:

  • JDK1.8
  • Maven3.x:Maven 3.3以上版本
  • IntelliJ IDEA
  • Spring Boot 1.5.9.RELEASE

multiplayer_perceptron多层感知器

发表于 2018-12-16 | 分类于 TensorFlow
字数统计: 525 | 阅读时长 ≈ 2

多层感知器MultiLayer Perceptron

​ 多层感知器又感知机推广而来,最主要的特点是有多个神经元层,因此也叫深度神经网络(DNN:Deep Neural Networks)。MLP是一种前馈人工神经完了过,它将输入的多个数据集映射到单一的输出数据集上。

​ MLP可以看作是一个有向图,由多个的节点层组成,每一层都全连接到下一层。除了输入节点,每个节点都是一个带有非线性激活函数的神经元。而反向传播算法(BP:Back Propagation算法)的监督学习方法用来训练MLP。

1
2
3
4
5
6
7
8
9
10
11
12
13
14
15
16
17
18
19
20
21
22
23
24
25
26
27
28
29
30
31
32
33
34
35
36
37
38
39
40
41
42
43
44
45
46
47
48
49
50
51
52
53
54
55
56
57
58
59
60
61
62
63
64
65
66
67
68
69
70
71
72
73
74
75
76
77
78
79
80
81
82
83
84
85
86
87
#author:victor

#import module
from __future__ import print_function
import tensorflow as tf

# Import MNIST data
from tensorflow.examples.tutorials.mnist import input_data
mnist = input_data.read_data_sets("C:/Users/DELL/Desktop/TensorFlow/MINISTdatabase/MNIST_data", one_hot=True)


# Parameters
learning_rate = 0.001
training_epochs = 15
batch_size = 100
display_step = 1

# Network Parameters
n_hidden_1 = 256 # 1st layer number of neurons
n_hidden_2 = 256 # 2nd layer number of neurons
n_input = 784 # MNIST data input (img shape: 28*28)
n_classes = 10 # MNIST total classes (0-9 digits)

# tf Graph input
X = tf.placeholder("float", [None, n_input])
Y = tf.placeholder("float", [None, n_classes])

# Store layers weight & bias
weights = {
'h1': tf.Variable(tf.random_normal([n_input, n_hidden_1])),
'h2': tf.Variable(tf.random_normal([n_hidden_1, n_hidden_2])),
'out': tf.Variable(tf.random_normal([n_hidden_2, n_classes]))
}
biases = {
'b1': tf.Variable(tf.random_normal([n_hidden_1])),
'b2': tf.Variable(tf.random_normal([n_hidden_2])),
'out': tf.Variable(tf.random_normal([n_classes]))
}


# Create model
def multilayer_perceptron(x):
# Hidden fully connected layer with 256 neurons
layer_1 = tf.add(tf.matmul(x, weights['h1']), biases['b1'])
# Hidden fully connected layer with 256 neurons
layer_2 = tf.add(tf.matmul(layer_1, weights['h2']), biases['b2'])
# Output fully connected layer with a neuron for each class
out_layer = tf.matmul(layer_2, weights['out']) + biases['out']
return out_layer

# Construct model
logits = multilayer_perceptron(X)

# Define loss and optimizer
loss_op = tf.reduce_mean(tf.nn.softmax_cross_entropy_with_logits_v2(
logits=logits, labels=Y))
optimizer = tf.train.AdamOptimizer(learning_rate=learning_rate)
train_op = optimizer.minimize(loss_op)
# Initializing the variables
init = tf.global_variables_initializer()

with tf.Session() as sess:
sess.run(init)

# Training cycle
for epoch in range(training_epochs):
avg_cost = 0.
total_batch = int(mnist.train.num_examples/batch_size)
# Loop over all batches
for i in range(total_batch):
batch_x, batch_y = mnist.train.next_batch(batch_size)
# Run optimization op (backprop) and cost op (to get loss value)
_, c = sess.run([train_op, loss_op], feed_dict={X: batch_x,
Y: batch_y})
# Compute average loss
avg_cost += c / total_batch
# Display logs per epoch step
if epoch % display_step == 0:
print("Epoch:", '%04d' % (epoch+1), "cost={:.9f}".format(avg_cost))
print("Optimization Finished!")

# Test model
pred = tf.nn.softmax(logits) # Apply softmax to logits
correct_prediction = tf.equal(tf.argmax(pred, 1), tf.argmax(Y, 1))
# Calculate accuracy
accuracy = tf.reduce_mean(tf.cast(correct_prediction, "float"))
print("Accuracy:", accuracy.eval({X: mnist.test.images, Y: mnist.test.labels}))

运行结果

multiplayer perceptron

使用KNN分类MNIST_data

发表于 2018-12-16 | 分类于 TensorFlow
字数统计: 485 | 阅读时长 ≈ 2

使用KNN(K-NearestNeighbor)

​ 邻近算法,或者说K最近邻(KNN,k-NearestNeighbor)分类算法是数据挖掘分类技术中最简单的方法之一。所谓K最近邻,就是k个最近的邻居的意思,说的是每个样本都可以用它最接近的k个邻居来代表。

​ KNN算法的核心思想是如果一个样本在特征空间中的k个最相邻的样本中的大多数属于某一个类别,则该样本也属于这个类别,并具有这个类别上样本的特性。该方法在确定分类决策上只依据最邻近的一个或者几个样本的类别来决定待分样本所属的类别。 KNN方法在类别决策时,只与极少量的相邻样本有关。由于KNN方法主要靠周围有限的邻近的样本,而不是靠判别类域的方法来确定所属类别的,因此对于类域的交叉或重叠较多的待分样本集来说,KNN方法较其他方法更为适合。

1
2
3
4
5
6
7
8
9
10
11
12
13
14
15
16
17
18
19
20
21
22
23
24
25
26
27
28
29
30
31
32
33
34
35
36
37
38
39
40
41
42
43
44
45
46
47
#import module
from __future__ import print_function

import numpy as np
import tensorflow as tf

# Import MNIST data
from tensorflow.examples.tutorials.mnist import input_data
mnist = input_data.read_data_sets("C:/Users/DELL/Desktop/TensorFlow/MINISTdatabase/MNIST_data", one_hot=True)

# In this example, we limit mnist data
Xtr, Ytr = mnist.train.next_batch(5000) #5000 for training (nn candidates)
Xte, Yte = mnist.test.next_batch(200) #200 for testing

# tf Graph Input
xtr = tf.placeholder("float", [None, 784])
xte = tf.placeholder("float", [784])

# Nearest Neighbor calculation using L1 Distance
# Calculate L1 Distance
distance = tf.reduce_sum(tf.abs(tf.add(xtr, tf.negative(xte))), reduction_indices=1)
# Prediction: Get min distance index (Nearest neighbor)
pred = tf.arg_min(distance, 0)

accuracy = 0.

# Initialize the variables (i.e. assign their default value)
init = tf.global_variables_initializer()

# Start training
with tf.Session() as sess:

# Run the initializer
sess.run(init)

# loop over test data
for i in range(len(Xte)):
# Get nearest neighbor
nn_index = sess.run(pred, feed_dict={xtr: Xtr, xte: Xte[i, :]})
# Get nearest neighbor class label and compare it to its true label
print("Test", i, "Prediction:", np.argmax(Ytr[nn_index]), \
"True Class:", np.argmax(Yte[i]))
# Calculate accuracy
if np.argmax(Ytr[nn_index]) == np.argmax(Yte[i]):
accuracy += 1./len(Xte)
print("Done!")
print("Accuracy:", accuracy)

运行结果

KNN Classfication

Neural Network普通神经网络

发表于 2018-12-16 | 分类于 TensorFlow
字数统计: 336 | 阅读时长 ≈ 1

Neural Networks神经网络

1
2
3
4
5
6
7
8
9
10
11
12
13
14
15
16
17
18
19
20
21
22
23
24
25
26
27
28
29
30
31
32
33
34
35
36
37
38
39
40
41
42
43
#author:victor
#Nenural Networks神经网络
'''
input layer->hidden layer1->hidden layer2->hidden layer3...->output layer
#输入层->隐藏层->输出层
#激活函数Activation Function(激励函数)
#神经网络的基本原理:梯度下降Gradient Descent in Neural Nets
#Optimization优化器
1、Newton's method牛顿法
2、Least Squares method最小二乘法
3、Gradient Descent梯度下降法(也就是求导,求微分)神经网络就是梯度下降里的分支
Cost=(predicted-real)^2=(Wx-y)^2=(W-0)^2(误差曲线)
局部最优解,全局最优解
'''
#import module
import tensorflow as tf
import numpy as np

#create data
x_data=np.random.rand(100).astype(np.float32)#tensorflow大部分数据是float32
y_data=x_data*0.1+0.3

#create tensorflow structure start#
Weights=tf.Variable(tf.random_uniform([1],-1.0,1.0))#random_uniform():随机均匀分布
#define the biases
biases=tf.Variable(tf.zeros([1]))

y=Weights*x_data+biases#预测的y

loss=tf.reduce_mean(tf.square(y-y_data))#计算预测的y与真实的y的差值,也就是损失函数
optimizer=tf.train.GradientDescentOptimizer(0.5)#learning rate学习效率一般是小于1的数
train=optimizer.minimize(loss)

init=tf.initialize_all_variables()#初始化全局变量
#create tensorflow structure end#

sess=tf.Session()
sess.run(init)

for step in range(201):#0到200,也就是201步
sess.run(train)
if step%20==0:
print(step,sess.run(Weights),sess.run(biases))

运行结果

Neural Network

总结:使用普通神经网络,计算误差用的最小二乘法,也即是真实值-预测值的平方

Session的用法

发表于 2018-12-16 | 分类于 TensorFlow
字数统计: 109 | 阅读时长 ≈ 1

Session的用法

1
2
3
4
5
6
7
8
9
10
11
12
13
14
15
16
17
18
19
20
21
22
23
24
25
#author:victor

#Session的用法讲解
#import module
import tensorflow as tf

#define two constant matrix
matrix1=tf.constant([[3,3]])
matrix2=tf.constant([[2],
[2]])
#using matrix multiply
product=tf.matmul(matrix1,matrix2)#matrix multiply 在numpy中是np.dot(matrix1,matrix2)

#method 1
#从session中的run中获取结果
sess=tf.Session()
result=sess.run(product)
print(result)
sess.close()

#method 2
#session自动close,推荐适用这个
with tf.Session() as sess:
result2=sess.run(product)
print(result2)

运行结果

Session

总结:

  • sess=tf.InteractiveSession()
  • with sess.as_default():
  • with tf.Session() as sess:
  • sess=tf.Session()

variable与constant的用法

发表于 2018-12-16 | 分类于 TensorFlow
字数统计: 509 | 阅读时长 ≈ 2

variable与constant

1
2
3
4
5
6
7
8
9
10
11
12
13
14
15
16
17
18
19
20
21
22
23
24
25
26
27
28
29
30
31
32
33
34
35
36
37
38
39
40
41
42
43
44
45
46
47
#author:victor

#import module
import tensorflow as tf
#常量constant
#tf.constant()函数定义
#def constant(value,dtype=None,shape=None,name='Const',verify_shape=False):
#value:符合tf中定义的数据类型的常数值或者常数列表
#dtype:数据类型,可选
#shape:常量的形状,可选
#name:常量的名字,可选
#verify_shape:常量的形状是否可以被更改,默认不可更改
#Simple hello world using TensorFlow
#The op is added as a node to the default graph
#The value returned by the constructor represents the output of the Constant op.

hello=tf.constant("Hello,TensorFlow!")
# Constant 1-D Tensor populated with value list.
tensor1 = tf.constant([1, 2, 3, 4, 5, 6, 7])

# Constant 2-D tensor populated with scalar value -1.
tensor2 = tf.constant(-1.0, shape=[2, 3])

#变量Variable
#tf.Variable()函数定义
#def Variable(initializer,name):
#initializer:是初始化参数
#name:可自定义的变量名
tensor3=tf.Variable(tf.random_normal(shape=[4,3],mean=0,stddev=1),name='tensor3')
#def random_normal(shape,mean=0.0,stddev=1.0,dtype=dtypes.float32,seed=None,name=None):
#shape:变量的形状,必选,shape=[4,3],4行3列矩阵
#mean:正态分布(the normal distribution)的均值E(x),默认是0
#stddev:正态分布的标准差sqrt(D(x)),默认是1.0
#dtype:输出的类型,默认为tf.float32
#seed:随机数种子,是一个整数,当设置后,每次运行的时候生成的随机数都一样
#name:操作的名称
#Start tf session
#推荐适用with tf.Session() as sess,因为它创建完Session后可以自动关闭上下文
#一个Session对象封装了Operation执行对象的环境,并对Tensor对象进行计算
with tf.Session() as sess:
#Run graph
print(sess.run(hello))
print(sess.run(tensor1))
print(sess.run(tensor2))
#必须要加上这句,初始化全局变量,否则会报错Attempting to use uninitialized value tensor3
sess.run(tf.global_variables_initializer())
print(sess.run(tensor3))

运行结果:

variable与constant

variable的用法

1
2
3
4
5
6
7
8
9
10
11
12
13
14
15
16
17
18
19
20
#author:victor
#Variable变量的用法
#import module
import tensorflow as tf

#define the variable
state=tf.Variable(0,name='counter')
#print(state.name)
con=tf.constant(1)

new_value=tf.add(state,con)
update=tf.assign(state,new_value)

#must have if define variable,使用变量Variable必须使用
init=tf.global_variables_initializer()
with tf.Session() as sess:
sess.run(init)
for _ in range(3):
sess.run(update)
print(sess.run(state))

运行结果

variable

Batch Normalization批标准化

发表于 2018-12-16 | 分类于 TensorFlow
字数统计: 1.4k | 阅读时长 ≈ 6

Batch Normalization批标准化

1
2
3
4
5
6
7
8
9
10
11
12
13
14
15
16
17
18
19
20
21
22
23
24
25
26
27
28
29
30
31
32
33
34
35
36
37
38
39
40
41
42
43
44
45
46
47
48
49
50
51
52
53
54
55
56
57
58
59
60
61
62
63
64
65
66
67
68
69
70
71
72
73
74
75
76
77
78
79
80
81
82
83
84
85
86
87
88
89
90
91
92
93
94
95
96
97
98
99
100
101
102
103
104
105
106
107
108
109
110
111
112
113
114
115
116
117
118
119
120
121
122
123
124
125
126
127
128
129
130
131
132
133
134
135
136
137
138
139
140
141
142
143
144
145
146
147
148
149
150
151
152
153
154
155
156
157
158
159
160
161
162
163
164
165
166
167
168
169
170
171
172
173
174
175
176
177
178
179
180
181
182
183
184
185
186
187
188
189
190
191
192
193
194
195
196
197
198
199
200
201
202
203
204
205
206
207
208
209
210
211
212
213
214
215
216
217
218
219
220
221
222
223
#author:victor

#为什么要批标准化(Batch Normalization)?
#Why need batch normalization?
"""
将分散的数据的统一标准化的方法。
数据分布会对神经网络训练产生影响
因为没有进行标准化,导致数据不敏感。
是为了克服神经网络层数加深导致难以训练而诞生的一个算法。
根据ICS理论,当训练集的样本数据和目标样本集分布不一致的时候,
训练得到的模型无法很好的泛化
在神经网络中,每一层的输入在经过层内操作之后必然会导致与原来对应的输入信号分布不同
,并且前层神经网络的增加会被后面的神经网络不对的累积放大。
这个问题的一个解决思路就是根据训练样本
与目标样本的比例对训练样本进行一个矫正,
而BN算法(批标准化)则可以用来规范化某些层或者所有层的输入
从而固定每层输入信号的均值与方差

Batch也就是把Data分成小批小批的来进行梯度下降。
解决方法:
显示数据X,然后经过全连接层fully connection layer,然后Batch Normalization(BN)
添加在数据X和全连接层之间。
然后在经过激励函数,再经过全连接层,这么下去
BN可以加快你的机器学习,也可以很有效的训练。
"""
#import module
import numpy as np
import tensorflow as tf
import matplotlib.pyplot as plt


#ACTIVATION = tf.nn.relu#activation function,所有层都使用relu
ACTIVATION = tf.nn.tanh#activation function,所有层都使用tanh
N_LAYERS = 7#搭建7个hidden layer
N_HIDDEN_UNITS = 30#每个hidden layer有30个神经元

#重复观看的功能
def fix_seed(seed=1):
# reproducible
np.random.seed(seed)
tf.set_random_seed(seed)

#打印图
def plot_his(inputs, inputs_norm):
# plot histogram for the inputs of every layer
for j, all_inputs in enumerate([inputs, inputs_norm]):
for i, input in enumerate(all_inputs):
plt.subplot(2, len(all_inputs), j*len(all_inputs)+(i+1))
plt.cla()
if i == 0:
the_range = (-7, 10)
else:
the_range = (-1, 1)
plt.hist(input.ravel(), bins=15, range=the_range, color='#FF5733')
plt.yticks(())
if j == 1:
plt.xticks(the_range)
else:
plt.xticks(())
ax = plt.gca()
ax.spines['right'].set_color('none')
ax.spines['top'].set_color('none')
plt.title("%s normalizing" % ("Without" if j == 0 else "With"))
plt.draw()
plt.pause(0.01)

#搭建神经网络
def built_net(xs, ys, norm):
def add_layer(inputs, in_size, out_size, activation_function=None, norm=False):
# weights and biases (bad initialization for this case)
Weights = tf.Variable(tf.random_normal([in_size, out_size], mean=0., stddev=1.))
biases = tf.Variable(tf.zeros([1, out_size]) + 0.1)

# fully connected product
Wx_plus_b = tf.matmul(inputs, Weights) + biases

# normalize fully connected product
if norm:
# Batch Normalize
#fc_mean:整批数据的均值
#fc_var:整批数据的方差
fc_mean, fc_var = tf.nn.moments(
Wx_plus_b,
axes=[0], # the dimension you wanna normalize, here [0] for batch
# for image, you wanna do [0, 1, 2] for [batch, height, width] but not channel
#如果你是图片的话,就在0,1,2(batch, height, width)三个维度上求均值,方差
)
scale = tf.Variable(tf.ones([out_size]))
shift = tf.Variable(tf.zeros([out_size]))
epsilon = 0.001

# apply moving average for mean and var when train on batch
ema = tf.train.ExponentialMovingAverage(decay=0.5)
def mean_var_with_update():
ema_apply_op = ema.apply([fc_mean, fc_var])
with tf.control_dependencies([ema_apply_op]):
return tf.identity(fc_mean), tf.identity(fc_var)
mean, var = mean_var_with_update()


Wx_plus_b = tf.nn.batch_normalization(Wx_plus_b, mean, var, shift, scale, epsilon)
#使用了tf.nn.batch_normalization方法就是和下面注释计算的本质88一样。
# similar with this two steps:
# Wx_plus_b = (Wx_plus_b - fc_mean) / tf.sqrt(fc_var + 0.001)
# Wx_plus_b = Wx_plus_b * scale + shift
#scale是扩大的参数
#shift是平移的参数


# activation,也就是上面的Weights+biases计算完后放到激活函数激活
if activation_function is None:
outputs = Wx_plus_b
else:
outputs = activation_function(Wx_plus_b)

return outputs

fix_seed(1)

#如果使用normalization,也就是加入BN层
if norm:
# BN for the first input
#fc_mean:整批数据的均值
#fc_var:整批数据的方差
fc_mean, fc_var = tf.nn.moments(
xs,
axes=[0],
)
scale = tf.Variable(tf.ones([1]))
shift = tf.Variable(tf.zeros([1]))
epsilon = 0.001
# apply moving average for mean and var when train on batch
ema = tf.train.ExponentialMovingAverage(decay=0.5)
def mean_var_with_update():
ema_apply_op = ema.apply([fc_mean, fc_var])
with tf.control_dependencies([ema_apply_op]):
return tf.identity(fc_mean), tf.identity(fc_var)
mean, var = mean_var_with_update()
xs = tf.nn.batch_normalization(xs, mean, var, shift, scale, epsilon)

# record inputs for every layer
layers_inputs = [xs]

# build hidden layers
for l_n in range(N_LAYERS):
layer_input = layers_inputs[l_n]
in_size = layers_inputs[l_n].get_shape()[1].value

output = add_layer(
layer_input, # input
in_size, # input size
N_HIDDEN_UNITS, # output size
ACTIVATION, # activation function
norm, # normalize before activation
)
layers_inputs.append(output) # add output for next run

# build output layer
prediction = add_layer(layers_inputs[-1], 30, 1, activation_function=None)

cost = tf.reduce_mean(tf.reduce_sum(tf.square(ys - prediction), reduction_indices=[1]))
train_op = tf.train.GradientDescentOptimizer(0.001).minimize(cost)
return [train_op, cost, layers_inputs]#network的功能就是输出train_op, cost, layers_inputs

# make up data
fix_seed(1)
x_data = np.linspace(-7, 10, 2500)[:, np.newaxis]
np.random.shuffle(x_data)
noise = np.random.normal(0, 8, x_data.shape)
y_data = np.square(x_data) - 5 + noise

# plot input data
plt.scatter(x_data, y_data)
plt.show()

xs = tf.placeholder(tf.float32, [None, 1]) # [num_samples, num_features]
ys = tf.placeholder(tf.float32, [None, 1])

train_op, cost, layers_inputs = built_net(xs, ys, norm=False) # without BN
train_op_norm, cost_norm, layers_inputs_norm = built_net(xs, ys, norm=True) # with BN

sess = tf.Session()
if int((tf.__version__).split('.')[1]) < 12 and int((tf.__version__).split('.')[0]) < 1:
init = tf.initialize_all_variables()
else:
init = tf.global_variables_initializer()
sess.run(init)

# record cost
cost_his = []
cost_his_norm = []
record_step = 5

plt.ion()
plt.figure(figsize=(7, 3))
for i in range(250):
if i % 50 == 0:
# plot histogram
all_inputs, all_inputs_norm = sess.run([layers_inputs, layers_inputs_norm], feed_dict={xs: x_data, ys: y_data})
plot_his(all_inputs, all_inputs_norm)

# train on batch
sess.run([train_op, train_op_norm], feed_dict={xs: x_data[i*10:i*10+10], ys: y_data[i*10:i*10+10]})

if i % record_step == 0:
# record cost
cost_his.append(sess.run(cost, feed_dict={xs: x_data, ys: y_data}))
cost_his_norm.append(sess.run(cost_norm, feed_dict={xs: x_data, ys: y_data}))

#matplotlib的默认显示模式为block模式。就是使用Plt.show(),程序会暂停,
#并不会继续执行下去,如果要展示动态图就要使用plt.ion()
#把block模式改为interactive交互模式
#plt.show()之前一定不要忘了加plt.ioff(),否则界面一闪而过,并不会停留
plt.ioff()
plt.figure()
#display no batch normalizatoin
plt.plot(np.arange(len(cost_his))*record_step, np.array(cost_his), label='no BN')

#display batch normalization result
plt.plot(np.arange(len(cost_his))*record_step, np.array(cost_his_norm), label='BN')

plt.legend()
plt.show()

运行结果:

batch normalization

总结:发现批标准化后的数据更集中,而不是分散与某个极端,使得训练结果更好泛化。

使用Autoencoder自编码进行Classfication

发表于 2018-12-16 | 分类于 TensorFlow
字数统计: 625 | 阅读时长 ≈ 3

使用Autoencoder进行Classfication

1
2
3
4
5
6
7
8
9
10
11
12
13
14
15
16
17
18
19
20
21
22
23
24
25
26
27
28
29
30
31
32
33
34
35
36
37
38
39
40
41
42
43
44
45
46
47
48
49
50
51
52
53
54
55
56
57
58
59
60
61
62
63
64
65
66
67
68
69
70
71
72
73
74
75
76
77
78
79
80
81
82
83
84
85
86
87
88
89
90
91
92
93
94
95
96
97
98
99
100
101
102
103
104
105
106
107
108
109
110
111
112
113
114
115
116
117
118
119
120
121
122
123
#author:victor
#use encoder_decoder classfication

#import module
import tensorflow as tf
import matplotlib.pyplot as plt
import numpy as np

#import MNIST data
from tensorflow.examples.tutorials.mnist import input_data
mnist=input_data.read_data_sets('MNIST_data',one_hot=False)

#Visualize decoder setting
#Parameters
learning_rate=0.001
training_epochs=20
batch_size=256
display_step=1


#Network Parameters
n_input=784#MNIST data input(img shape:28*28),也即是784个features

#tf.Graph input(only pictures)
X=tf.placeholder('float',[None,n_input])

#hidden layer settings
n_hidden_1=128#first num features,先经过一个隐藏层压缩成128个features
n_hidden_2=64#second num features,在经过一个隐藏层压缩成64个features
n_hidden_3=10#third num features,先经过一个隐藏层压缩成10个features
n_hidden_4=2#fourth num features,在经过一个隐藏层压缩成2个features
#define the weights
weights={
'encoder_h1':tf.Variable(tf.random_normal([n_input,n_hidden_1])),
'encoder_h2':tf.Variable(tf.random_normal([n_hidden_1,n_hidden_2])),
'encoder_h3':tf.Variable(tf.random_normal([n_hidden_2,n_hidden_3])),
'encoder_h4':tf.Variable(tf.random_normal([n_hidden_3,n_hidden_4])),

'decoder_h1':tf.Variable(tf.random_normal([n_hidden_4,n_hidden_3])),
'decoder_h2':tf.Variable(tf.random_normal([n_hidden_3,n_hidden_2])),
'decoder_h3':tf.Variable(tf.random_normal([n_hidden_2,n_hidden_1])),
'decoder_h4':tf.Variable(tf.random_normal([n_hidden_1,n_input])),
}
#define the biases
biases={
'encoder_b1':tf.Variable(tf.random_normal([n_hidden_1])),
'encoder_b2':tf.Variable(tf.random_normal([n_hidden_2])),
'encoder_b3':tf.Variable(tf.random_normal([n_hidden_3])),
'encoder_b4':tf.Variable(tf.random_normal([n_hidden_4])),

'decoder_b1':tf.Variable(tf.random_normal([n_hidden_3])),
'decoder_b2':tf.Variable(tf.random_normal([n_hidden_2])),
'decoder_b3':tf.Variable(tf.random_normal([n_hidden_1])),
'decoder_b4':tf.Variable(tf.random_normal([n_input])),
}

#building the encoder
def encoder(x):
layer_1=tf.nn.sigmoid(tf.add(tf.matmul(x,weights['encoder_h1']),
biases['encoder_b1'] ))
#Decoder hidden layer with sigmoid activation function
layer_2=tf.nn.sigmoid(tf.add(tf.matmul(layer_1,weights['encoder_h2']),
biases['encoder_b2']))
layer_3=tf.nn.sigmoid(tf.add(tf.matmul(layer_2,weights['encoder_h3']),
biases['encoder_b3'] ))
#no use activation function
layer_4=tf.add(tf.matmul(layer_3,weights['encoder_h4']),
biases['encoder_b4'])
return layer_4

#building the decoder
def decoder(x):
#Encoder hidden layer with sigmoid activation
layer_1=tf.nn.sigmoid(tf.add(tf.matmul(x,weights['decoder_h1']),
biases['decoder_b1'] ))
#Decoder hidden layer with sigmoid activation function
layer_2=tf.nn.sigmoid(tf.add(tf.matmul(layer_1,weights['decoder_h2']),
biases['decoder_b2']))
#Encoder hidden layer with sigmoid activation
layer_3=tf.nn.sigmoid(tf.add(tf.matmul(layer_2,weights['decoder_h3']),
biases['decoder_b3'] ))
#Decoder hidden layer with sigmoid activation function
layer_4=tf.nn.sigmoid(tf.add(tf.matmul(layer_3,weights['decoder_h4']),
biases['decoder_b4']))
return layer_4

#Construct model
encoder_op=encoder(X)
decoder_op=decoder(encoder_op)

#Prediction
y_pred=decoder_op
#Targets(Labels) are the input data
y_true=X

#Define loss and optimizer,minimize the squre error
cost=tf.reduce_mean(tf.pow(y_true-y_pred,2))
optimizer=tf.train.AdamOptimizer(learning_rate).minimize(cost)

#Initializing the variables
init=tf.initialize_all_variables()

#Launch the graph
with tf.Session() as sess:
sess.run(init)
total_batch=int(mnist.train.num_examples/batch_size)
#Train cycle
for epoch in range(training_epochs):
#Loop overall batches
for i in range(total_batch):
batch_xs,batch_ys=mnist.train.next_batch(batch_size)#max(x)=1,min(x)=0,batch_xs已经被normalize正规化过了,最大值是1
#Run optimization op (backprop) and cost op (to get loss value)
_,c=sess.run([optimizer,cost],feed_dict={X:batch_xs})
#Display logs per epoch step
if epoch% display_step==0:
print("Epoch",'%04d'%(epoch+1),
"cost=","{:9f}".format(c))

print("Optimization Finished!")

encoder_result=sess.run(encoder_op,feed_dict={X:mnist.test.images})
plt.scatter(encoder_result[:,0],encoder_result[:,1],c=mnist.test.labels)
plt.show()

运行结果:

classfication

总结:等运行结束后,以散点图scatter的形式展现出来,不同颜色表示MNIST data里的不同的数字lable,发现Classfication的效果还是不错

12…7
Victor Drq

Victor Drq

70 日志
8 分类
1 标签
RSS
GitHub E-Mail 博客园
© 2018 Victor Drq | Site words total count: 62k
本站访客数:
由 Hexo 强力驱动
|
主题 — NexT.Pisces v5.1.4